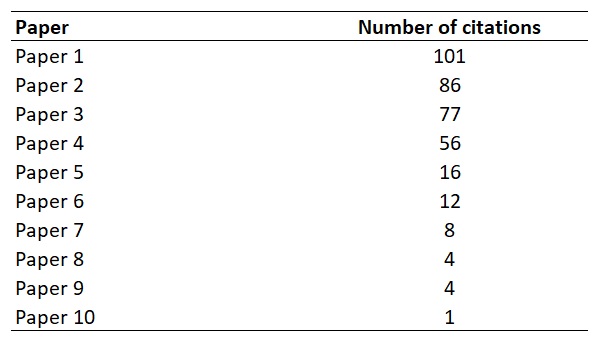
Skip to Main Content

Scholarly Metrics

An overview of scholarly metrics and the tools you can use to find them.

Considerations when finding and using author metrics

  • Author metrics can be helpful when comparing researchers in a similar field, subject, or department, who also have similar career lengths.
  • If a researcher has not claimed their profile on a given platform, the author metrics provided for them there may be highly inaccurate. 
  • Author metrics will tend to reflect disparities related to gender, race, ethnicity, etc., due to their basis in citation counts.  
  • Basic author metrics (like h-index) cannot be meaningfully compared between/across different fields or subfields.
  • Author metrics that claim to be normalized by field or discipline rely on platform-defined and platform-dependent categorization of journals by subject area, rather than how the field/discipline is defined or understood by scholarly communities. They also won't be meaningful when someone's work is transdisciplinary or interdisciplinary.  

Finding author metrics in Web of Science

  1. Start at Web of Science Core Collection 
  2. Click on the "Researchers" tab (above the search box) and search for a first and last name. Depending on how common an author's name is, and whether they've claimed their profile in Web of Science, there may be one or more results.
  3. Click on an author's name to view the metrics available for them. If there are multiple results that likely represent the same person, select the checkboxes next to each one, and choose "View as Combined Record" at the top.   

Claiming your Web of Science profile will allow you to ensure that the list of publications attributed to you (and the author metrics generated by Web of Science from those publications) will be more accurate.

  1. To claim your Web of Science profile, follow the steps above. 
  2. Click on the profile that includes most of your work, then click "Claim my record" and follow the instructions.
  3. Once you've created your Web of Science account and claimed your record, you'll be able to edit your profile (e.g., removing extraneous publications).

Finding author metrics in Scopus

  1. Start at Scopus
  2. Click on the Authors tab (above the search box), and search for a first and last name. Depending on how common an author's name is, and whether they've claimed their profile in Scopus, there may be one or more results. 
  3. Click on an author's name to view the metrics available for them. If there are multiple results that likely represent the same person, select the checkboxes next to each one, and choose "Citation Overview" at the top.

Claiming your Scopus profile will allow you to ensure that the list of publications attributed to you (and the author metrics generated from those publications) will be more accurate.

  1. To claim your Scopus profile, follow the steps above. 
  2. Either click on the profile that includes most of your work, then click "Edit" to create a Scopus account, or check the boxes next to the profiles that include most of your work, then click "Request to merge authors" to create a Scopus account.
  3. Once you've created your Scopus account, you'll be able to claim and edit your profile (e.g., removing extraneous publications). 

Finding author metrics in Google Scholar

  1. Start at Google Scholar
  2. Search for an author's name. Depending on whether the author has claimed their profile in Google Scholar, there will usually be one (or zero) results.
  3. Click on the result (if any).

Claiming your Google Scholar profile will allow you to ensure that the list of publications attributed to you (and the author metrics generated from those publications) will be more accurate.

  1. Start at Google Scholar and click "My Profile" at the top of the page.
  2. Follow the prompts to set up your profile. Make sure to use a personal (non-institutional) Gmail address to create your profile: do NOT use your NYU email address!
  3. In the "Email for verification" field, enter your NYU email address.  
  4. Make sure to check the box that says "Make my profile public" (or the link that says "MAKE PUBLIC") if you want other people to be able to view your profile.
  5. Check your NYU email and follow the instructions in the verification message from Google. Once you've verified your email address, you'll be able to continue editing your profile and adding publications.