
For assistance, please
Stay in touch by signing up for our Data Services newsletter.
If you've interacted with us before, please tell us how we did.
Bobst Library, 5th floor
Mondays: 12pm - 5pm
Tuesdays: 12pm - 5pm
Wednesdays: 12pm - 5pm
Thursdays: 12pm - 5pm
Fridays: 12pm - 5pm
ATLAS.ti is a qualitative research tool that can be used for coding and analyzing transcripts & field notes, building literature reviews, creating network diagrams, and data visualization.
NYU Students are able to access ATLAS.ti for free via the the Virtual Computing Lab (VCL).
Warning regarding the VCL: Please be sure you are familiar with successfully saving your when working on the VCL before you begin coding. We have several incidents of loss to data due to issues in saving materials, therefore it is best for users to export the project bundle if they want a copy on their personal computer. We recommend you access the VCL using Chrome or Firefox, given we have had issues with the Safari browser.
NYU community members can access ATLAS.ti for free on the 5th floor of Bobst Library in the Data Services Lab.
For Comprehensive information, please see the NYU IT ATLAS.ti page.
Please see Atlas 9 Instructions
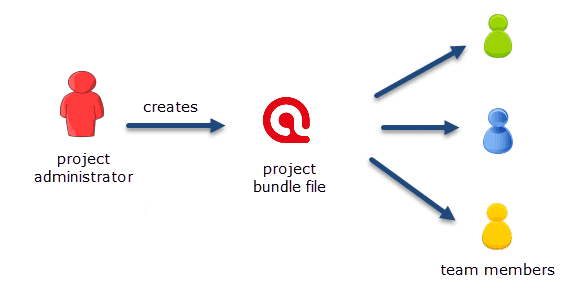
The project administrator sets up a Master project. See Creating a New Project.
The project administrator adds documents to the project and possibly a list of codes.
The project administrator saves the project and exports it. This means creating a project bundle file .
All team members import the project bundle file and begin their work.
To combine the work of all team members, each team member creates a project bundle file and sends it to the project administrator.
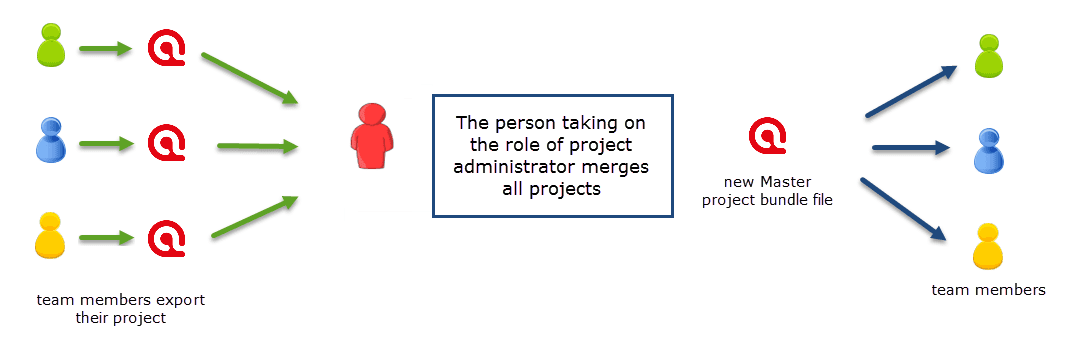
The project administrator merges all sub projects and creates a new Master file.
Mary exports the new Master file and distributes it to all team members. See Transfer Projects.
The team members continue their work.
This cycle continues. If new documents need to be added to the project, this needs to be done by the project administrator. A good time for doing this is after merging and before creating the new Master file.
You find step-by-step instructions here:
If all team members should work on the same documents, it is essential that only the project administrator is setting up the project adding all documents. Otherwise, the documents are duplicated or multiplied during the process of merging. See Adding Documents.
Team members must not edit documents. If they do, the edited documents cannot be merged, and you end up with duplicates. If document editing is necessary, this needs to be done by the project administrator in the Master project!
The location of where ATLAS.ti stores project related data can be determined by each user. See Working with ATLAS.ti Libraries.
Document libraries CANNOT be shared. Each person always works with her/his own copy of the data set within her/his own environment of ATLAS.ti.
To import your project from Atlas 8 into ATLAS.ti 9,
In ATLAS.ti 8 select Project Export --> Project Bundle or QDPX Project Bundle. This creates a single-file copy of your project.
In ATLAS.ti 9, select “Import Project” from the start screen.
IMPORTANT: While project transfer from ATLAS.ti 8 Windows to ATLAS.ti 9 is fully supported, backwards compatibility is limited to .QDPX files.
To transfer your project to another computer with either ATLAS.ti 9 installed, simply export it via File --> Export and select either .atlproj or .qdpx project bundles.
Import iTunes Voice Memos as (.M4A) files into Atlas! According to the Atlas software we have installed in Data Services, these are the audio/video file types that Atlas supports:
*.AIF, *.AIFC, *.AIFF, *.ASF, *.AU, *.AVI, *.DVR-MS, *.IVF, *.M1V, *.M2V, *.M4A, *.M4B, *.M4V, *.MID, *.MIDI, *.MOV, *.MP2, *.MP2V, *.MP3, *.MP4, *.MP4V, *.MPA, *.MPE, *.MPEG, *.MPG, *.MPV2, *.RMI, *.SND, *.WAV, *.WM, *.WMA, *.WMV
Please see Atlas 9 Instructions
The project administrator sets up a Master project. See Creating a New Project.
The project administrator adds documents to the project and possibly a list of codes.
The project administrator saves the project and exports it. This means creating a project bundle file .
All team members import the project bundle file and begin their work.
To combine the work of all team members, each team member creates a project bundle file and sends it to the project administrator.
The project administrator merges all sub projects and creates a new Master file.
Mary exports the new Master file and distributes it to all team members. See Transfer Projects.
The team members continue their work.
This cycle continues. If new documents need to be added to the project, this needs to be done by the project administrator. A good time for doing this is after merging and before creating the new Master file.
You find step-by-step instructions here:
If all team members should work on the same documents, it is essential that only the project administrator is setting up the project adding all documents. Otherwise, the documents are duplicated or multiplied during the process of merging. See Adding Documents.
Team members must not edit documents. If they do, the edited documents cannot be merged, and you end up with duplicates. If document editing is necessary, this needs to be done by the project administrator in the Master project!
The location of where ATLAS.ti stores project related data can be determined by each user. See Working with ATLAS.ti Libraries.
Document libraries CANNOT be shared. Each person always works with her/his own copy of the data set within her/his own environment of ATLAS.ti.
To import your project from Atlas 8 into ATLAS.ti 9,
In ATLAS.ti 8 select Project Export --> Project Bundle or QDPX Project Bundle. This creates a single-file copy of your project.
In ATLAS.ti 9, select “Import Project” from the start screen.
IMPORTANT: While project transfer from ATLAS.ti 8 Windows to ATLAS.ti 9 is fully supported, backwards compatibility is limited to .QDPX files.
To transfer your project to another computer with either ATLAS.ti 9 installed, simply export it via File --> Export and select either .atlproj or .qdpx project bundles.
Import iTunes Voice Memos as (.M4A) files into Atlas! According to the Atlas software we have installed in Data Services, these are the audio/video file types that Atlas supports:
*.AIF, *.AIFC, *.AIFF, *.ASF, *.AU, *.AVI, *.DVR-MS, *.IVF, *.M1V, *.M2V, *.M4A, *.M4B, *.M4V, *.MID, *.MIDI, *.MOV, *.MP2, *.MP2V, *.MP3, *.MP4, *.MP4V, *.MPA, *.MPE, *.MPEG, *.MPG, *.MPV2, *.RMI, *.SND, *.WAV, *.WM, *.WMA, *.WMV

Original work in this LibGuide is licensed under a Creative Commons Attribution-NonCommercial-ShareAlike 4.0 International License.